
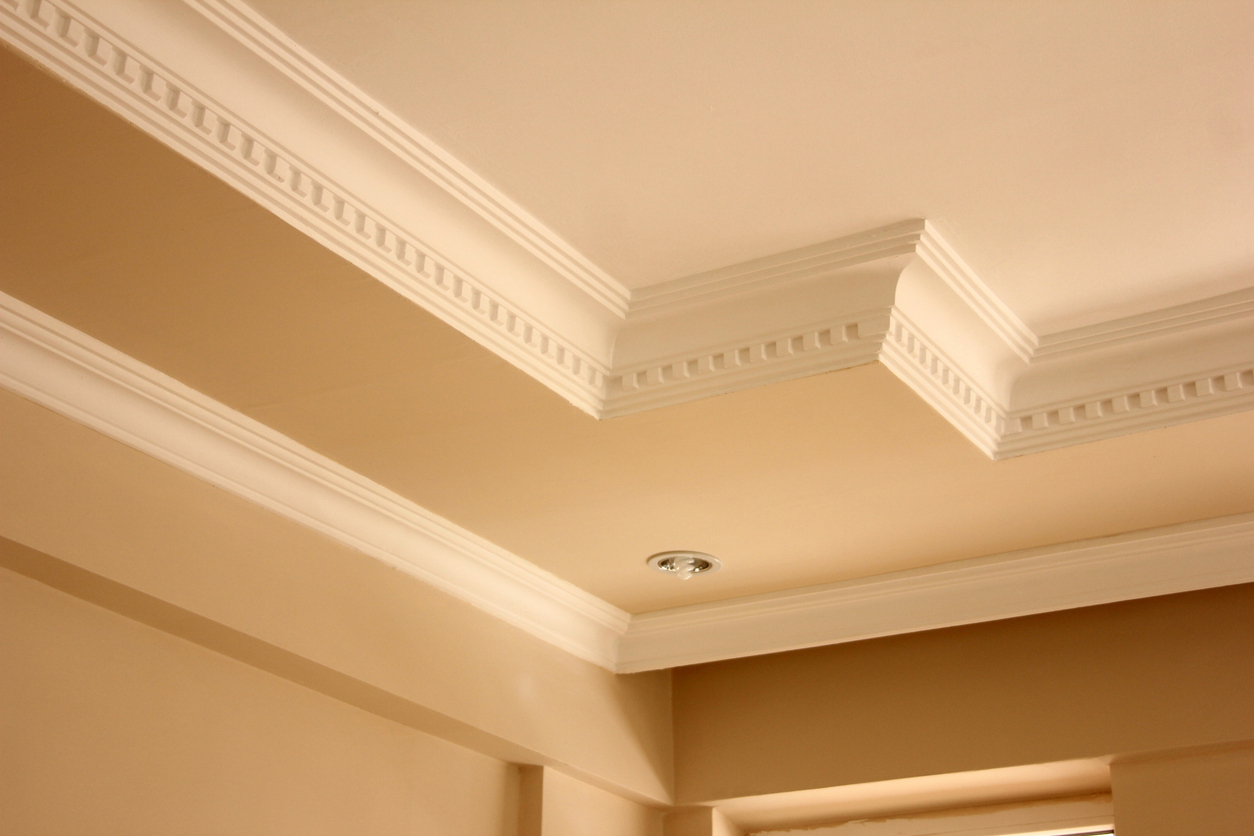
Crown molding is a decorative trim installed along the top edges of a room where the walls meet the ceiling, adding elegance and architectural interest to Fremont area homes. It’s a popular home improvement project that can significantly enhance the aesthetic appeal of a home’s interior. Crown molding comes in various materials, including wood, plaster, and polyurethane, each with unique characteristics and installation requirements.
This article aims to give homeowners a comprehensive understanding of crown molding as a home improvement project. Specifically, it will compare the do-it-yourself (DIY) approach to hiring professionals to install and paint crown molding. The comparison will cover various aspects, including cost, time investment, skill level required, outcome quality, and each option’s pros and cons.
By doing so, the article seeks to equip readers with the knowledge they need to decide whether to undertake crown molding installation and painting as a DIY project or hire professionals to achieve the desired results.
Understanding crown molding
Its history dates back to ancient Greek and Roman architecture when it was used to beautify spaces and denote luxury and refinement. Over the centuries, crown molding has evolved, with its design and materials reflecting the architectural styles and technological advancements of the times.
Originally, crown molding served both a decorative and functional purpose. In ancient buildings, it was often part of the entablature (the superstructure of moldings and bands that lie horizontally above columns). It served to cap walls, divide spaces aesthetically, and reduce the visual harshness where walls meet ceilings. It was also used to conceal imperfections and transitions between different materials. Over time, its use spread from grand temples and public buildings to private residences, where it became a symbol of wealth and sophistication.
Materials
The materials used for crown molding have varied significantly over the years:
- Plaster – In historic homes, plaster was the material of choice for crown molding, allowing for intricate designs but requiring skilled craftsmanship.
- Wood – Traditional and still popular due to its versatility and the warmth it adds to a room. Wood molding can be painted or stained and comes in a variety of profiles.
- Polyurethane – A modern alternative to wood and plaster, polyurethane molding is lightweight, resistant to warping and rot, and comes in many styles. It’s easier to install and maintain.
- Polystyrene – An affordable, foam-based option that is easy to cut and install, making it suitable for DIY projects. However, it is less durable and lacks the refined finish of other materials.
- PVC and vinyl – Used in bathrooms and kitchens due to their resistance to moisture and mold. These materials are practical for certain environments but don’t offer the same aesthetic appeal as wood or plaster.
Styles
Crown molding styles can vary significantly, reflecting historical and regional design influences:
- Classic – Inspired by ancient Greek and Roman architecture, featuring symmetrical shapes and often incorporating motifs like egg-and-dart or dentil patterns.
- Victorian – Characterized by intricate designs and elaborate patterns, reflecting the opulence of the Victorian era.
- Craftsman – Simpler, with clean lines and natural wood finishes that complement the Craftsman architectural style.
- Modern or Contemporary – Features minimalistic designs with smoother, less ornate profiles, fitting for modern aesthetics.
Aesthetic and value addition
Crown molding significantly enhances a Santa Clara home’s aesthetic appeal and perceived value. It adds character and depth to rooms, elevates the overall design, and creates a finished look that can make spaces feel more luxurious and cohesive. When it comes to home value, while the direct impact on resale value can vary, crown molding is often seen as a desirable feature by potential buyers, contributing to the home’s overall attractiveness and marketability.
Crown molding is a versatile design element with a rich history. It can transform spaces and add elegance to any home. Whether restoring a historic property or designing a contemporary space, a crown molding style and material can complement your vision.
DIY crown molding installation and painting
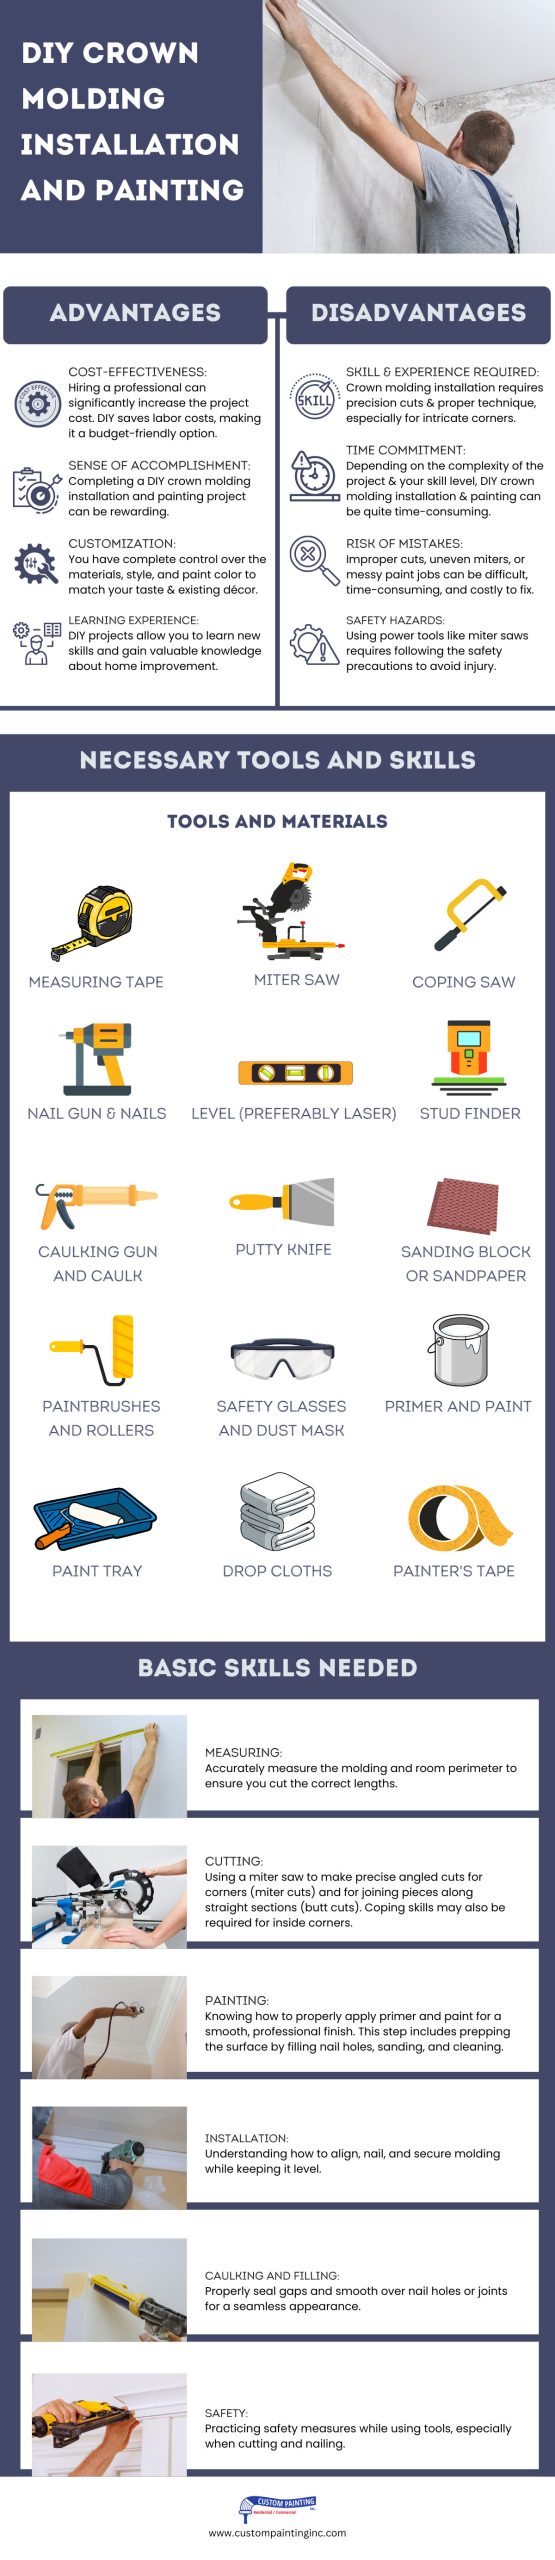
Advantages
- Cost-effectiveness—Hiring a professional can significantly increase the project cost. DIY saves labor costs, making it a budget-friendly option.
- Sense of accomplishment – Completing a DIY crown molding installation and painting project can be rewarding.
- Customization – You have complete control over the materials, style, and paint color to match your taste and existing décor.
- Learning experience – DIY projects allow you to learn new skills and gain valuable knowledge about home improvement.
Disadvantages
- Skill and experience required – Crown molding installation requires precision cuts and proper technique, especially for intricate corners. Without experience, achieving a professional look can be challenging.
- Time commitment – Depending on the complexity of the project and your skill level, DIY crown molding installation and painting can be quite time-consuming.
- Risk of mistakes – Improper cuts, uneven miters, or messy paint jobs can be difficult and time-consuming. Material waste due to mistakes can also add to the cost.
- Safety hazards – Using power tools like miter saws requires following the safety precautions to avoid injury. Working on ladders or scaffolding can also be risky.
Necessary tools and skills
Tools and materials
- Measuring tape – Essential for accurate measurement of walls and molding lengths.
- Miter saw – Used for making precise cuts at various angles. A compound miter saw is ideal for cutting the complex angles required for crown molding.
- Coping saw – Handy for making cope cuts in the molding, allowing for tighter joints at corners.
- Nail gun and nails – A pneumatic or electric nail gun is preferred for securely attaching molding to walls and ceilings.
- Level (preferably laser) – Ensures the molding is installed straight and true.
- Stud finder – Helps locate studs in the wall for a secure molding attachment.
- Caulking gun and caulk—These are used to seal joints and gaps between the molding and the ceiling/wall for a finished look.
- Putty knife –This is for applying and smoothing wood filler on nail holes or imperfections.
- Sanding block or sandpaper – This is used to smooth the wood filler and any rough edges on the molding.
- Paintbrushes and rollers – For priming and painting the molding.
- Safety glasses and dust mask – Essential for personal protection during cutting and sanding.
- Primer and paint – A quality primer and paint suitable for the molding material.
- Paint tray – For holding and rolling out the paint.
- Drop cloths – To protect floors and furniture from paint spills and splatters.
- Painter’s tape – This is used to mask off the ceiling and walls to get clean paint lines.
Basic skills needed:
- Measuring – Accurately measure the molding and room perimeter to ensure you cut the correct lengths.
- Cutting – Using a miter saw to make precise angled cuts for corners (miter cuts) and for joining pieces along straight sections (butt cuts). Coping skills may also be required for inside corners.
- Painting – Knowing how to properly apply primer and paint for a smooth, professional finish. This step includes prepping the surface by filling nail holes, sanding, and cleaning.
- Installation – Understanding how to align, nail, and secure molding while keeping it level.
- Caulking and filling – Properly seal gaps and smooth over nail holes or joints for a seamless appearance.
- Safety – Practicing safety measures while using tools, especially when cutting and nailing.
Step-by-step overview
Here’s a guide on how to install and paint crown molding DIY-style:
Planning and preparation
- Carefully measure the walls where you will install the crown molding.
- Choose your crown molding material according to your home’s style and budget. Wood is traditional but more expensive, while MDF and polystyrene are more affordable and easier to work with.
- Gather your tools and materials (listed above).
Cutting and installing
- Use your miter saw to cut the molding at a 45-degree angle for corners. For inside corners, you may need to use a coping saw to fit one piece over the other precisely.
- Before attaching anything, dry-fit your pieces to ensure they fit well. This step is crucial for avoiding mistakes.
- Use your nail gun (or hammer) and finishing nails to attach the molding to the wall and ceiling. For some lightweight materials, construction adhesive may be sufficient or used in conjunction with nails.
- Caulk the top and bottom edges where the molding meets the ceiling and wall to fill any gaps. Patch nail holes with wood filler or spackle.
Painting
- Lightly sand the crown molding to prepare the surface for painting. This step is especially important if you’ve patched any areas.
- Priming is optional. If your molding is not pre-primed, apply a primer to ensure a smooth, even finish. Let it dry according to the manufacturer’s instructions.
- Use a high-quality brush or a small roller to apply paint in the color of your choice. For a professional-looking finish, apply two coats, allowing the first coat to dry completely before applying the second.
Finishing touches
- After the paint has dried, inspect your work for any areas needing a touch-up. Use caulk to fill any gaps that might have been missed or have appeared after installation.
- Remove any protective coverings from your furniture and floors. Clean your tools with the appropriate solvents and store them properly.
Additional tips:
- Practice cutting on scrap pieces of molding before starting on your actual pieces.
- Take your time with measuring and cutting to ensure the best fit.
- To avoid smudging or sticking, be patient and allow the paint and caulk to dry completely before proceeding to the next step.
With careful planning and attention to detail, you can successfully install and paint crown molding, adding a beautiful architectural feature to your home. Remember, practice makes perfect, especially when cutting and fitting molding. Good luck with your project!
Professional crown molding installation and painting
Advantages
- Quality and precision – Professionals bring expertise and precision to the table, ensuring the crown molding is cut and installed perfectly. This precision is crucial for achieving a seamless look, especially in rooms with irregular angles or unique architectural features.
- Time savings—Professional installations can be completed much faster than DIY projects. Skilled workers have the experience and tools to complete the job efficiently, saving time and hassle.
- Access to high-quality materials – Professionals often have access to higher-quality materials. They can recommend the best options for durability and aesthetics, which might not be readily available to the general public.
- Customization – Professionals can provide customized solutions that fit your room’s specific dimensions and style, offering a range of designs from traditional to contemporary.
- Stress-free—Hiring professionals means you don’t have to worry about the complexities involved in the installation process, from measuring and cutting to installing and painting.
- Longevity and warranty – Professional work often comes with a warranty, ensuring that any issues that arise post-installation can be addressed without additional costs.
Disadvantages
- Cost – The most significant disadvantage is the cost. Professional services can be expensive, especially for high-quality materials and intricate designs.
- Finding the right contractor – Finding a reliable and skilled contractor can be challenging. The process requires time for research, reading reviews, and getting quotes.
- Limited control – While professionals can offer advice and suggestions, you might have less control over the exact details of the project, such as scheduling or the pace of work.
- Possible miscommunications – Without clear communication, there might be misunderstandings about the design, timeline, or cost, potentially leading to dissatisfaction with the result.
- Dependence on contractor’s schedule – Your project timeline may depend on the contractor’s availability, which could lead to delays, especially during peak seasons.
- Risk of property damage – While rare, there’s always a risk of accidental damage to your property during the installation or painting.
Before deciding on professional crown molding installation and paint, weigh the advantages and disadvantages of your specific needs, budget, and timeline. Conducting thorough research and selecting a reputable contractor can mitigate some disadvantages and ensure a satisfactory outcome for your project.
What to look for in a professional

When hiring a San Jose area professional contractor for crown molding installation and painting, you should consider several important factors to ensure high-quality workmanship and a smooth experience. Here’s a list of key points to look for:
- Experience and specialization: Look for a contractor with significant experience in crown molding installation and painting. Specialization in these areas often results in higher-quality work.
- Licenses and certifications: Ensure the contractor is licensed to work in your area. Licenses indicate they meet the minimum standards for their trade. Certifications from trade organizations or manufacturers can also indicate a higher level of expertise and commitment to quality.
- Insurance: A reputable contractor will have liability insurance and workers’ compensation insurance to protect you and your employees in case of accidents.
- References and portfolio: Ask for references and a portfolio of previous work. This can give you insight into the quality of their work and expertise in similar projects.
- Detailed estimates: Get detailed, written estimates that break down the cost of materials, labor, and other expenses. Getting accurate and transparent job estimates can help prevent unexpected costs and compare bids more accurately.
- Communication skills: Choose a contractor who communicates clearly and effectively. Good communication is crucial for understanding your vision and ensuring it’s realized.
- Professionalism: Note the contractor’s meeting punctuality, how well they explain the process, and their general demeanor. Professionalism often correlates with the quality of work and the overall service experience.
- Warranty or guarantee: Ask if the contractor offers a warranty or guarantee on their work. This can provide peace of mind and protection against any issues that may arise after the project is completed.
- Timeline and availability: Discuss the project timeline and make sure it aligns with your needs. Availability can also be an indicator of a contractor’s reliability and demand.
- Clean-up and safety measures: Inquire about their clean-up process and safety measures, especially if you’ll be living in the home while the work is being done.
- Review agreements and contracts carefully: Before signing anything, review all agreements and contracts carefully. Ensure all aspects of the project are covered, including start and completion dates, detailed scope of work, payment schedule, and procedures for handling changes.
- Check Reviews and Online Presence: Online reviews and the contractor’s presence on social media or their website can offer additional insights into their work ethic, quality, and customer satisfaction.
- Payment schedule: Understand the payment schedule. Be cautious of contractors who require large deposits upfront. Payment schedules should be reasonable and tied to project milestones.
Making the decision
Choosing between DIY (Do It Yourself) and hiring professionals for a home-building project is a significant decision that impacts the project’s cost, timeline, quality, and overall success. Here are several factors to consider when making this choice:
1. Personal Skills and Experience
- DIY: Requires a solid understanding of construction principles, familiarity with building codes, and practical skills in tasks such as framing, plumbing, electrical work, and finishing. If you have experience in construction or related trades, you might be well-equipped to handle at least some parts of the project yourself.
- Professional: If you lack the necessary skills or are not confident in your ability to learn and apply them quickly, hiring professionals can ensure that the work is done correctly and safely.
2. Available time
- DIY: Building or renovating a home can be very time-consuming. If you plan to do it yourself, you need to have enough free time to dedicate to the project, considering that it can take much longer than anticipated due to learning curves, mistakes, and unforeseen challenges.
- Professional: Professionals can complete the work faster due to their experience, skills, and access to a team. Hiring professionals is often the best option if you have a tight timeline or cannot afford to take extensive time away from your job or family.
3. Project scale and complexity
- Small and simple projects: If you cover only a small area for your crown molding installation and paint project, it might be well-suited for DIY if you have the skills and time.
- Large and complex projects: The complexity and need for specialized skills often make hiring professionals the safer and more efficient choice for extensive renovations or building a house from the ground up.
4. Costs and budget
- DIY: It can be less expensive in terms of labor costs, but there’s a risk of higher costs in the long run due to mistakes, wastage, and the potential need to redo work or hire professionals to fix errors.
- Professional: Involves higher upfront labor costs but can provide better value through quality workmanship, efficiency, and avoiding costly mistakes. Professionals also have access to discounts and trade prices for materials.
5. Legal and safety considerations
- Permits and regulations – Familiarity with local building codes and permit requirements is crucial. DIY projects often run the risk of non-compliance, which can result in fines or problems when selling the property.
- Safety: Professional builders have the training and equipment to safely handle hazardous materials and situations.
6. Quality and resale value
- DIY: While you can achieve high-quality results, inconsistent workmanship or unconventional choices might affect the home’s resale value.
- Professional: Generally, it ensures a high standard of work that complies with industry standards and appeals to future buyers.
Conclusion
It’s important to realistically assess your skills, resources, and goals when planning your crown molding and paint project. If you know what you’re doing and pick the correct tools and materials, you can install crown molding and paint yourself. You can save a lot of money if you choose the DIY route and derive personal satisfaction from doing the project yourself.
You’ll probably want to hire a Union City area professional contractor near you to get the best results. If you choose to hire a contractor, it’s important to take some time to vet contractors based on the criteria earlier mentioned thoroughly. It can help you find a skilled and reliable professional who will complete your crown molding and painting project satisfactorily.
Some choose a hybrid approach, taking on parts of the project they are confident about and hiring professionals for the rest. Doing so can balance the desire for hands-on involvement with the assurance of professional quality where it counts most.
Ultimately, the decision should align with your priorities, whether budget, quality, time, or the satisfaction of building something with your hands. Consulting with professionals to understand costs and timelines can also provide valuable insights as you make this decision.
Custom Painting, Inc. offers custom crown molding and trim installation and paints new and existing crown molding and trim. We use only the best materials to satisfy our customers’ needs. Our skilled and professional crew delivers craftsmanship with clean, prompt, reliable, and friendly service. If you’re living in or near Fremont and looking for quality paint, repairs, and custom installation service, call us at 925-866-9610 or send us a message for a free estimate.
