

Homeowners in the Fremont, CA area who want a quick, economical, but effective way to refresh and update the look of their properties turn to painting. Not only does a fresh coat of paint beautify your home, but it can also protect it against the elements and help extend its life. The not-so-secret of an exterior paint job’s success doesn’t only lie in quality paints and well-chosen tools. Prep work is also crucial to achieve the desired results in your paint job.
In addition to cleaning the exterior surface, priming is essential depending on the surface type and condition, the paint you choose, or a drastic color change. Priming can be a necessary part of surface prep work that helps the finishing paint adhere better to the surface, resulting in a durable and long-lasting paint job.
To prime or not to prime?
Whether or not to prime the exterior surface of your home before painting depends on several factors:
Surface condition: If the surface is in good condition, clean, and smooth, you can skip priming. But if it’s rough, porous, or has stains, priming is recommended to create a smooth base for the paint.
Type of surface: Certain surfaces like bare wood, metal, or masonry may require priming to ensure proper adhesion and longevity of the paint job.
Type of paint: Some paints have built-in primers or are formulated to adhere well without a separate primer. Check the manufacturer’s instructions to see if priming is necessary for your specific paint.
Weather exposure: If the surface is exposed to harsh weather conditions, priming can provide an extra layer of protection against moisture and UV rays, extending the paint job’s life.
Color change: If you’re drastically changing the color of the surface, especially if going from dark to light or vice versa, priming can help achieve better coverage and color accuracy.
In general, it’s often recommended to prime exterior surfaces before painting, especially if there are any doubts about the surface’s condition or the paint’s compatibility. It’s an extra step that can significantly improve the durability and finish of the paint job in the long run.
Assessing your home’s exterior

Importance of a thorough evaluation
Before starting any work, assess the condition of your home’s exterior surface first to learn its material type and present condition. Knowing the material type of your home’s exterior surface (wood, metal, vinyl, etc.) and thoroughly understanding its current condition will better equip you to address problems that may prevent a smooth and long-lasting paint job.
Identifying areas in need of repair
Identifying exterior surface areas requiring repair and painting involves a systematic inspection and assessment process. Here’s a brief overview:
- Visual inspection – Begin by visually inspecting the entire exterior surface of the structure. Look for signs of wear, damage, or deterioration. Common issues include peeling paint, cracks, mold or mildew growth, rust, and wood rot.
- Surface preparation – Check for areas where the paint has peeled or blistered. Use a scraper or wire brush to remove loose paint and debris. Sand the surface to create a smooth, clean base for repainting.
- Moisture detection – Pay attention to areas prone to moisture accumulation, such as windows, doors, and trim. Use a moisture meter to detect hidden moisture that could lead to paint failure or structural damage.
- Inspect for structural damage – Check for signs of structural damage, such as cracks in the siding, foundation, or trim. Addressing underlying structural issues is essential before applying paint to ensure long-lasting results.
- Evaluate substrate condition – Assess the condition of the underlying substrate (e.g., wood, metal, concrete). Look for signs of rot, corrosion, or deterioration that may require repairs or special treatment before painting.
- Check for mold and mildew – Look for areas with mold or mildew growth, especially in humid or shaded areas. Clean affected surfaces with a solution of bleach and water, then allow them to dry thoroughly before painting.
- Inspect caulking and seals – Check the condition of caulking and seals around windows, doors, and joints. Replace deteriorated caulking to prevent water infiltration and ensure a tight seal before painting.
- Assess color fading – Determine if the existing paint has faded unevenly or significantly. Consider whether a fresh coat of paint is needed to restore the aesthetic appeal and protect the surface from further damage.
- Consider environmental factors – Consider environmental factors, such as exposure to sunlight, moisture, temperature fluctuations, and air pollution. These can impact the durability and performance of paint coatings.
- Documentation – Document the areas needing repair and painting, noting the extent of damage and recommended actions. This documentation will guide the repair and painting process and be a reference for future maintenance.
By systematically inspecting and assessing exterior surfaces, you can identify areas needing repair and painting, ensuring the longevity and integrity of the structure’s exterior.
DIY or hire a professional painter?
If you’re deciding whether to DIY or hire a professional to paint your home’s exterior, you should look at several factors below:
- Consider the skill level. Painting a San Jose area home’s exterior requires skill and experience, especially when dealing with ladders, scaffolding, and intricate details. DIY might be feasible if you have experience and feel confident in your abilities. Otherwise, hiring a professional ensures a high-quality finish.
- Consider the time commitment. Painting a home’s exterior is a time-consuming task, often taking several days or weeks, depending on the house’s size and the job’s complexity. Consider whether you have the time to dedicate to the project or whether hiring a professional would be more efficient.
- How about the cost? DIY painting typically saves money on labor costs, but you’ll need to invest in equipment, paint, and other materials. Compare the DIY cost with the quotes from Sunnyvale area professional painters to determine the most cost-effective option.
- Safety is a priority in any paint job. Painting exteriors involves working at heights and using potentially hazardous materials. If you’re uncomfortable with heights or lack the necessary safety equipment, hiring a professional trained and equipped to handle such tasks safely is safer.
- If quality finish is important to you, professional painters have the expertise and tools to ensure a long-lasting finish. They also have access to better quality paints and may offer warranties on their work, giving you peace of mind.
If you have the necessary skills, time, and safety precautions, DIY painting can be cost-effective. However, if you’re unsure or lack the time and expertise, hiring a professional painter is likely the best choice for a high-quality, long-lasting finish.
The homeowner’s responsibility before commercial exterior painting

You want to update your Santa Clara home’s exterior with new paint and color schemes to enhance its curb appeal. But you know that exterior painting can be complex and risky, so hire a professional contractor. By leaving the job to the pros, you will save time, energy, and stress. But is there any responsibility left for you in the project?
Yes, you still have a role in the project! While you may not have the skills or training to paint your home, you still can contribute by preparing your home for professional painting. It is a big job, so before signing a contract, discuss with the contractor whether they will allow you to prepare the site before the crew arrives on painting day.
Many contractors may include prep work elements in their job estimates or be willing to do it for an extra fee. However, they may allow you to do the worksite preparation and thus exclude it from their job estimates.
One of the main benefits of preparing the site by yourself is cost savings. You may have to sweep your deck or trim the bushes, but a little effort won’t hurt. Besides, you’ll be able to save money while still getting the benefits of a professional paint service.
Before your contractor comes to paint your home, several responsibilities fall on you to ensure the site is properly prepared:
- Clearing the area – Remove any obstacles or items from the work area, such as outdoor furniture, potted plants, decorations, etc. This ensures easy access for the painters and prevents accidental damage to these items.
-
- Trimming vegetation – Trim back any bushes, shrubs, or trees obstructing the painting surface. This includes cutting back branches that may be touching or close to the walls.
- Turning off the sprinklers – If your sprinkler system has a set timer, turn it off before the crew arrives on painting day. You don’t want them to get soaking wet. Also, you don’t want some water drips or streaks landing in the paint finish.
- Protecting surroundings – Cover nearby plants, windows, doors, and other surfaces that will not be painted to protect them from overspray or accidental paint splatters.
- Keeping children and pets away (and cleaning after them) – Arrange to keep children and pets away from the work area. It ensures their safety and prevents any accidental disturbances to the painting process. If your pets or children leave some mess in the work area, clean up their waste and dispose of it properly.
- Checking weather conditions – Ensure that weather conditions are suitable for painting. Avoid painting in extreme heat, cold, rain, or high winds, as these conditions can affect paint application and drying times.
- Communicating with the painter – Discuss any specific concerns or requirements with the professional painter before they begin work. This includes discussing color choices, paint types, scheduling, and other relevant details.
By taking care of these responsibilities, homeowners can help ensure that the painting process goes smoothly and that the finished result meets their expectations.
Gathering the necessary materials and tools
Suppose you’re going to DIY the job instead of hiring a professional. Invest in the best-quality materials and tools your budget can afford. It can make the job easier and ensure a durable and professional-looking finish. Here’s a list of the recommended materials and tools:
Materials:
- High-quality exterior primer
- High-quality exterior paint
- High-quality exterior caulk
- High-performance wood hardener
- Exterior-grade adhesive, depending on the type of surface you work on
- Patch filler, wood filler, or epoxy, depending on the type of surface you work on
- Mildewcide (for wet or humid areas or if the exterior surface has been previously affected by mold or mildew)
- Paint strippers or removers
- Detergent or surface any cleaning agent
Tools:
- Power washer or pressure washer
- Scrapers and putty knives
- Sanding tools (use any):
- Sandpaper
- Sanding block
- Electric sander
- Caulking gun
- Paint application tools (use any of the three when applicable)
- High-quality paint brushes
- High-quality paint rollers and extension poles
- Paint sprayer
- Ladder or scaffold
- Drop cloths
- Plastic sheeting
- Painter’s tape
- Paint bucket and grid
- Safety gear:
- Goggles or safety glasses
- Gloves
- Dust mask or respirator
- Coveralls
- Hard hats
- Fall arrest systems such as harnesses and carabiners if working at heights
Cleaning the exterior surface
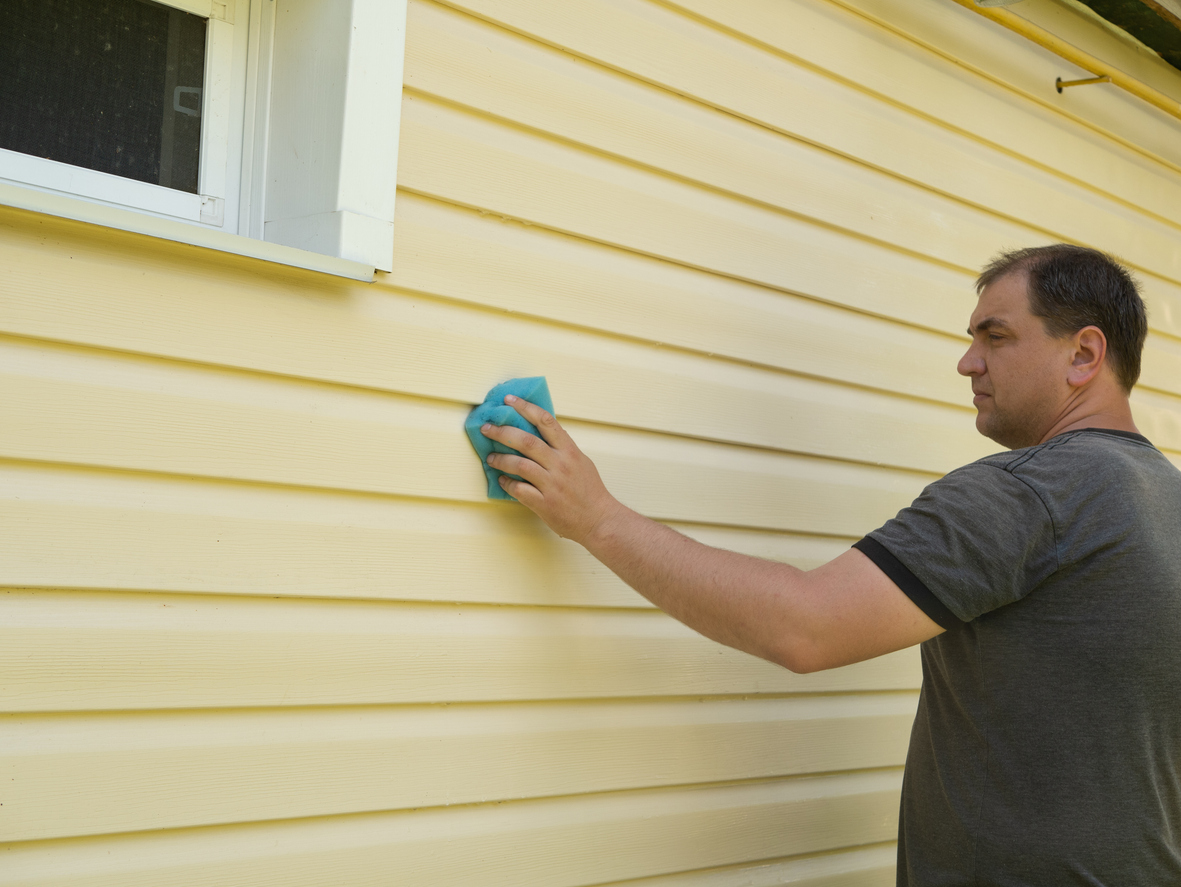
Exterior surface cleaning steps (and pressure washing tips)
Cleaning your home’s exterior walls effectively involves several steps, and pressure washing can be an efficient method for many surfaces. Here’s a brief guide:
After evaluating the condition of the walls, identifying any areas with heavy dirt, grime, mildew, or stains, and preparing the worksite, follow the cleaning steps below:
1. Dust and debris removal – Start using a broom, brush, or leaf blower to remove loose dirt, cobwebs, and debris from the walls.
2. Cleaning solution preparation – Depending on the surface type and the dirt level, prepare a cleaning solution. This could be a mixture of water, mild detergent, or specialized cleaners for specific stains like mold or mildew.
3. Testing the pressure washer – If using a pressure washer, test it on a small, inconspicuous area to ensure it’s not too powerful and won’t damage the surface. Adjust the pressure settings accordingly.
4. Pressure washing technique:
- Start from the top of the wall and work your way down to prevent streaking.
- Hold the pressure washer nozzle at a 45-degree angle to the wall to avoid direct spraying into cracks or seams.
- Keep the nozzle moving to prevent concentrated pressure in one spot, which can damage the surface.
- Use smooth, overlapping strokes, and maintain a consistent distance from the wall to ensure even cleaning.
- Pay extra attention to heavily soiled areas, but be cautious not to apply too much pressure, especially on delicate surfaces.
5. Rinsing – After applying the cleaning solution with the pressure washer, rinse the walls thoroughly with clean water. Again, start from the top and work your way down.
6. Drying – Allow the walls to air dry completely. Avoid using excessive force to dry the walls, which can cause streaking or damage.
7. Finishing touches – Inspect the walls for any remaining stains or spots. Repeat the cleaning process or spot-treat stubborn stains with appropriate cleaners if necessary.
8. Maintenance – Regularly inspect and clean the exterior walls to prevent dirt, mold, or mildew buildup.
Remember, safety is paramount when pressure washing any Mountain View area property. Wear appropriate protective gear, such as goggles and gloves, and be cautious of slippery surfaces. If you’re uncomfortable using a pressure washer or dealing with certain stains, consider hiring a professional cleaning service. However, Custom Painting, Inc. includes pressure washing as part of their preparation for exterior painting.
The importance of allowing surfaces to dry completely
Allowing exterior surfaces to dry thoroughly before painting is essential for maintaining the structural integrity, aesthetic appeal, and longevity of homes, buildings, and outdoor structures. Proper drying mitigates the risks of mold, rot, and decay while ensuring the effectiveness of protective coatings, ultimately reducing maintenance costs and preserving the value of properties.
Making repairs
Guide to fixing common exterior surface problems
Fixing common exterior surface problems is crucial before painting to ensure a smooth, durable finish. Here’s a guide to address some of the most common issues:
Peeling paint
- Cause: Usually due to moisture getting underneath the paint, poor adhesion, or painting over a dirty surface
- Fix: Scrape off the peeling paint, sand the area to smooth out the edges between the peeled and non-peeled areas, prime the bare surface, and then repaint.
Mildew
- Cause: Forms in areas with moisture, poor ventilation, or shade.
- Fix: Clean the surface with bleach and water (1 part bleach to 3 parts water) or a commercial mildew cleaner. Wear protective gear, scrub the area, rinse thoroughly, let it dry, and then apply paint.
Cracks and gaps
- Cause: Movement in the building, settling, or temperature changes.
- Fix: Use a high-quality exterior caulk to fill small cracks or gaps around windows, doors, and trim. For larger cracks, you may need to use a patching compound. Allow it to dry according to the manufacturer’s instructions before sanding smoothly. You may also need to consider options such as waterproofing your brick as well.
Chalking
- Cause: Degradation of the paint due to sunlight exposure, leading to a powdery residue.
- Fix: Clean the surface with a power washer or hand-washing with a detergent solution. Rinse thoroughly and allow it to dry before repainting.
Efflorescence
- Cause: Salt deposits that come to the surface of masonry or concrete as moisture moves through the wall.
- Fix: Remove by scrubbing with a stiff brush, water, and muriatic acid (following the manufacturer’s safety instructions). Neutralize the acid with water, rinse the area well, and let it dry before painting.
Rust stains
- Cause: Metal fasteners or fixtures corroding over time.
- Fix: Remove rust with a wire brush, sand the metal until smooth, prime with a rust-inhibiting primer, and repaint.
Wood rot
- Cause: Typically occurs in wood that is frequently exposed to moisture.
- Fix: Remove the rotted wood, treat the healthy wood with a wood hardener if necessary, and then fill the area with a wood filler. Sand smooth once dry and apply primer and paint.
Fading paint
- Cause: Exposure to sunlight and elements, using a paint color that’s not resistant to UV rays.
- Fix: There’s no fix for fading other than repainting. Use high-quality, UV-resistant exterior paint; consider lighter shades that fade less noticeably.
Safety first: Remember to wear appropriate protective gear, especially when dealing with chemicals or working at heights.
Tips for replacing damaged materials
Replacing damaged exterior siding involves several key steps to ensure the job is done correctly and safely.
After cleaning your home’s entire siding, follow these tips below on how to replace damaged exterior siding before painting:
- Safety first – Wear protective gear, including gloves, goggles, and a dust mask, to protect yourself from sharp edges and debris.
- Identify and prepare – Determine the extent of the damage and the type of siding you’re working with. Before starting the project, gather all necessary tools and materials, including replacement siding that matches the existing one, nails, a hammer, a utility knife, and a pry bar.
- Remove damaged siding – Use a pry bar to remove the damaged siding carefully. It’s important to work gently to avoid damaging the surrounding siding or the vapor barrier underneath. If you’re dealing with a large area, consider cutting out the damaged section with a circular saw set to the thickness of the siding.
- Prepare the surface – Once the damaged siding is removed, check the underlying surface for damage. Repair any issues with the sheathing or wrap and ensure the new siding’s surface is clean and smooth.
- Measure and cut replacement siding – Measure the area to be covered and cut the new siding to fit. Leaving a small gap for expansion and contraction is crucial due to temperature changes. Use a utility knife or a saw suitable for the type of siding material.
- Install the new siding – Start from the bottom up, ensuring each piece overlaps the one below it according to the manufacturer’s instructions. Nail the siding into place, being careful not to nail too tightly and allow for movement.
- Seal with caulk – Apply caulk around the edges of the new siding, especially near doors and windows, to seal any gaps.
- Inspect and clean up – After installation, inspect your work to ensure everything is secure and looks consistent. Clean up all tools and debris.
Remember, the specific steps and techniques may vary depending on the type of siding you’re working with (e.g., vinyl, wood, fiber cement). If you’re uncomfortable with the project or the extensive damage, consider hiring a professional.
Benefits of applying a primer
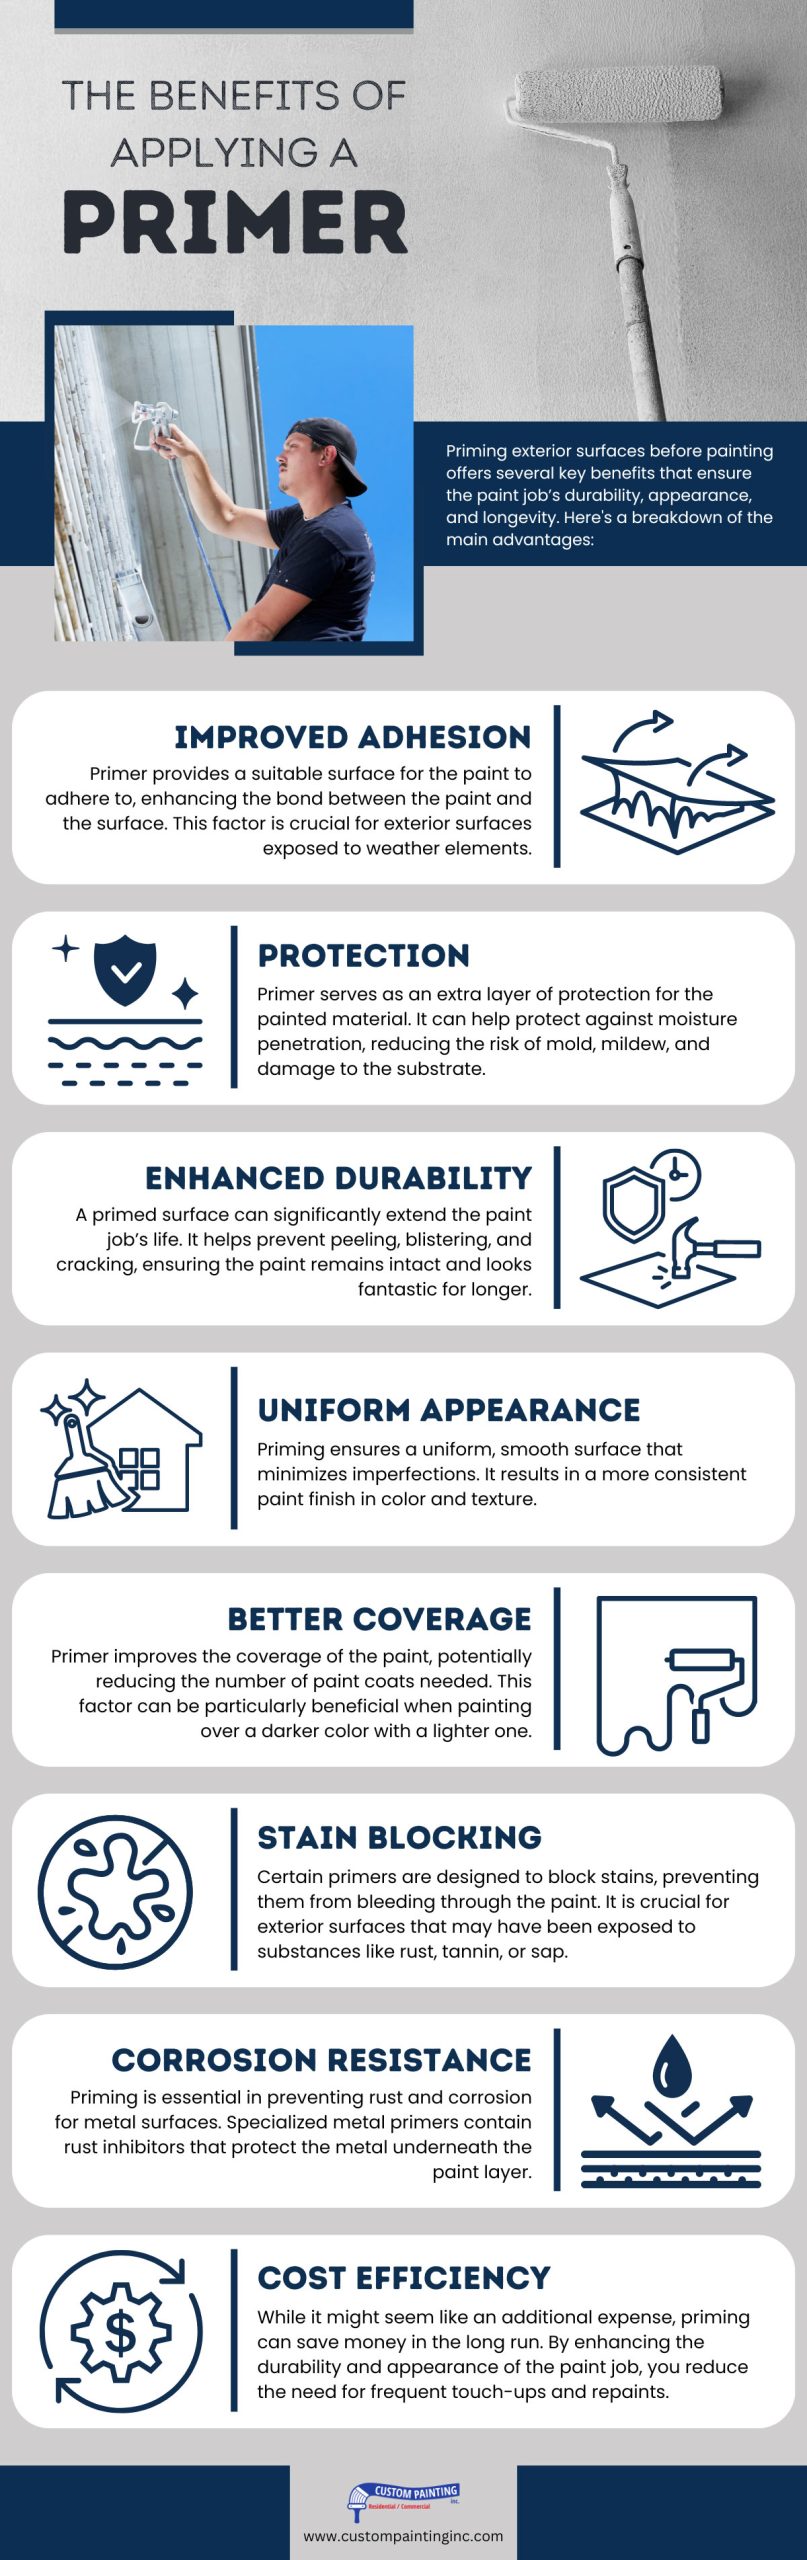
Priming your exterior surfaces before painting offers several important benefits:
- Adhesion – Primer provides a suitable surface for paint to adhere well, reducing the risk of peeling and flaking.
- Durability – A primed surface can enhance the paint job’s durability, ensuring it lasts longer and withstands weather conditions more effectively.
- Protection – Primer seals porous surfaces, protecting against moisture, rust (on metal surfaces), and other environmental elements.
- Uniformity – It helps to achieve a more uniform appearance by minimizing surface imperfections and ensuring the paint color is consistent and vibrant across the entire area.
- Efficiency – Priming can reduce the number of paint coats needed by sealing the surface and preventing the paint from soaking in, which can be cost-effective in terms of material and labor.
Selection criteria for the correct type of primer
Selecting the correct primer for exterior painting is crucial for achieving a durable and visually appealing finish. Here are the main factors to consider:
- Surface material – Various materials require specific primer types. For instance, wood, metal, and masonry each have primers formulated to best adhere to and protect their surfaces.
- Condition of surface – For surfaces with problems like peeling, cracking, or mildew, a primer that addresses these problems is necessary. There are primers designed to seal, bond, or resist mildew.
- Paint compatibility – Ensure the primer is compatible with the type of paint you plan to use. Water-based (latex) and oil-based paints sometimes require different types of primers.
- Weather resistance – Exterior primers should be capable of withstanding the local climate, including resistance to UV rays, moisture, temperature changes, and other environmental factors.
- Topcoat color – Using a tinted primer closer to the color of the topcoat can enhance color coverage and reduce the number of topcoat layers needed.
- VOC content – Consider the volatile organic compound (VOC) content for health and environmental reasons. Low-VOC or VOC-free primers are available.
- Manufacturer recommendations – Follow the paint manufacturer’s recommendations for the best results, as some primers and paints are formulated to work together.
Masking and covering areas
Protecting windows, doors, and landscaping before starting a painting project is crucial to ensure a clean, professional finish without damage to your property. Here are some strategies for each:
1. Protecting windows:
- Use painter’s tape – Apply it around the edges of the window frames to protect them from paint splatters and drips. Ensure the tape is pressed down firmly to prevent paint from seeping underneath.
- Plastic sheeting or drop cloths – Cover the window panes with plastic sheeting, securing it with painter’s tape. This protection is especially important if you’re using a sprayer. Alternatively, drop cloths can be used for painting near the window.
- Newspaper or cardboard – You can tape newspaper or cardboard directly over the glass for quick and easy protection for smaller windows.
2. Protecting doors
- Remove hardware – If possible, remove doorknobs, locks, and other hardware to avoid getting paint on them. If you can’t remove them, cover them with painter’s tape or use a small plastic bag secured with tape.
- Tape edges and windows – Use painter’s tape to cover the edges of the door, especially if it’s a different color from the frame you’re painting. If the door has windows, apply the same strategies as you would for standalone windows.
- Drop cloths – Place drop cloths under the door to catch any drips or spills, especially if you’re painting the door while it’s still hanging.
3. Protecting landscaping
- Cover with drop cloths or tarps – Before painting, cover nearby landscaping with drop cloths or tarps to protect plants from paint drips and spills. Secure the covers so they don’t blow away.
- Trim plants – Trim back bushes, shrubs, and other plants too close to the painting area. This will protect them from paint and make your job easier.
- Water shields – In some cases, watering your plants thoroughly before painting can help prevent paint from sticking to them. This is because the water fills the pores of the leaves, making it harder for paint to adhere.
- Temporary shields – For larger projects, consider setting up temporary plywood shields or similar barriers to protect landscaping from overspray, especially if using a paint sprayer.
General tips
- Inspect and prepare – Before you start painting, inspect the area for any repairs that may need to be made, such as caulking around windows and doors. Proper preparation can prevent future paint failures.
- Clean up promptly – After painting, remove any protective materials carefully to avoid spilling or smearing paint on the protected surfaces.
- Mind the weather – Avoid painting on windy days to minimize paint drifting onto unwanted surfaces, including windows, doors, and landscaping.
Taking the time to properly windows, doors, and landscaping ensures a cleaner painting process and helps prevent damage to your property, saving time and money in the long run.
Choosing the right paint
Factors to consider when choosing paint
When choosing exterior paint, consider several factors to ensure durability, aesthetics, and protection for your property. Here’s a brief list of the essential factors:
- Climate: The local weather conditions significantly influence your choice. Paints vary in resistance to sunlight, moisture, temperature changes, and harsh weather conditions.
- Surface material: Different surfaces (wood, masonry, metal, vinyl, etc.) require specific types of paint and preparation for optimal adhesion and longevity.
- Paint type: Latex-based (water-based) paints are popular for their ease of clean-up and flexibility, while oil-based paints are valued for their durability and stain resistance.
- Finish: The paint’s finish (matte, satin, semi-gloss, gloss) affects appearance and maintenance. Glossier finishes are typically more durable and easier to clean but might highlight imperfections.
- Color: Consider the paint’s color stability under exposure to sunlight and its ability to complement the property’s style and surroundings.
- Quality: High-quality paints often provide better coverage, longevity, and protection against the elements, making them a more cost-effective choice in the long term.
- Environmental regulations: Be aware of local environmental regulations that might restrict certain paints due to VOC (Volatile Organic Compounds) levels.
- Maintenance and durability: Some paints are formulated to resist mildew, fading, and peeling, reducing the need for frequent repainting.
- Cost: While cost is a factor, balancing initial expense with the paint’s durability and the need for future touch-ups or repainting is essential.
- Manufacturer’s reputation: Consider the brand and its reputation for quality, reliability, and warranty offers.
Choosing the right exterior paint involves balancing these factors to meet your needs and ensure your investment looks great and lasts for years.
The suitable types of paint for exterior surfaces (and their advantages)
Exterior paints come in various types, each with advantages depending on the surface to be painted and the environmental conditions. Here are some common types of exterior paints and their advantages:
Latex (water-based) paint advantages:
- Quick drying time.
- Low odor.
- Easy clean-up with water.
- Good color retention and resistance to fading.
- Flexible, allowing for expansion and contraction of the substrate.
- They are environmentally friendly as they contain fewer volatile organic compounds (VOCs) than oil-based paints.
Oil-based paint advantages:
- Excellent adhesion, making them suitable for surfaces with poor or unknown histories of previous coatings.
- Exceptional durability and resistance to abrasion, moisture, and weathering.
- Superior flow and leveling properties, resulting in a smoother finish.
- Good for high-traffic areas or surfaces prone to heavy wear and tear.
- It can provide a glossy finish if desired.
Acrylic paint advantages
- Good weather resistance, maintaining color and finish for an extended period.
- Excellent adhesion to various surfaces, including wood, metal, and masonry.
- Flexible, allowing for expansion and contraction of substrates without cracking or peeling.
- Resistant to mildew and fading.
- Low VOC content, making them environmentally friendly.
Alkyd paint advantages:
- High durability and excellent resistance to abrasion, moisture, and weathering.
- Good adhesion to a variety of surfaces.
- Provides a smooth, hard finish.
- Retains color and sheen well over time.
- Suitable for use in high-humidity areas.
Elastomeric paint advantages:
- They are highly flexible and can stretch and contract with temperature fluctuations, making them ideal for regions with extreme weather conditions.
- Excellent waterproofing properties, helping to seal out moisture.
- It can bridge small cracks and gaps in the substrate, reducing the likelihood of water intrusion and subsequent damage.
- Resistant to fading and mildew growth.
- Long-lasting, requiring less frequent repainting.
Each type of exterior paint has its own set of advantages, and the choice depends on factors such as the surface to be painted, environmental conditions, desired finish, and personal preferences. It’s essential to select the appropriate paint type based on these factors to achieve the best results in terms of appearance and durability.
Challenges of painting a home’s exterior
Weather Conditions: Exterior painting is greatly affected by weather conditions such as rain, wind, extreme temperatures, and humidity. Painting during adverse weather can lead to poor adhesion, uneven drying, and other issues.
- Surface preparation – Proper preparation of the surface is crucial for a successful paint job. Challenges include cleaning the surface, repairing cracks or damage, removing old paint, and applying primers.
- Height and accessibility – Painting exterior surfaces often involve working at heights, which can be hazardous without proper equipment and safety measures. Accessibility to certain areas, such as high walls or roofs, can pose challenges.
- Material compatibility –Different exterior surfaces require specific types of paint and preparation techniques. Ensuring compatibility between the paint and the surface material is essential to prevent issues like peeling or cracking.
- Environmental regulations – Local regulations and environmental concerns may restrict certain paint types or application methods. Compliance with these regulations adds complexity to the painting process.
- Time constraints – Exterior painting projects may need to be completed within a limited timeframe, especially when weather conditions are favorable. Delays due to weather or other factors can disrupt schedules and increase costs.
- Color selection – Choosing the right paint color for the exterior can be challenging, as it should complement the architectural style, surroundings, and personal preferences. Additionally, certain colors may fade or discolor over time due to exposure to sunlight and other environmental factors. As for homes painted in dark colors, they absorb heat and suffer from moisture issues than lighter shades. And because dark colors fade faster, they’re harder to touch than lighter shades.
- Budget constraints – Exterior painting projects can be costly, particularly for large or complex structures. Balancing quality, durability, and cost-effectiveness while staying within budget requires careful planning and decision-making.
Addressing these challenges requires careful planning, proper equipment, skilled labor, and adherence to best practices in painting techniques and safety protocols.
Planning your painting project
Timing and sequencing are crucial aspects of a successful paint job. Here are some best practices to follow:
- Prepare the surface – Ensure the surface is clean, dry, and debris-free before you begin to paint.
- Plan ahead – Determine the order of areas to be painted, considering accessibility and drying times.
- Prime first – Apply primer to bare surfaces before painting to enhance adhesion and durability.
- Work from top to bottom – Start painting from the highest point and work downwards to prevent drips and spills on freshly painted surfaces.
- Allow drying time – Allow sufficient drying time between coats to prevent smudging or mixing of colors.
- Follow manufacturer instructions – Adhere to the instructions on paint cans regarding drying times and application methods.
- Use proper tools – Use high-quality brushes, rollers, and sprayers suitable for the type of paint and surface.
- Avoid rushing – Take your time to ensure even coverage and proper application, especially when dealing with intricate details or large areas.
- Maintain consistency – Maintain a consistent technique and pressure while painting to achieve uniform results.
- Protect surfaces – Use masking tape and drop cloths to protect adjacent surfaces from paint splatters and spills.
- Touch-up last – Complete any touch-ups or detailing after the main painting is finished to ensure a seamless finish.
- Clean up properly – Clean brushes, rollers, and other tools promptly after use to prolong their lifespan and prevent dried paint buildup.
By following these best practices, you can ensure a smooth and successful paint job with optimal timing and sequencing.
How long does it take to prepare a building’s exterior before painting?
The average time range is 16 to 24 hours, depending on the size of the building and the number of repairs needed.
How long does it take to paint a commercial building’s exterior?
The the following are typical estimtes:
- 1,000 to 1,400 square feet for 2 to 3 days
- 1,800 to 2,100 square feet for 4 to 6 days
Custom Painting, Inc. has painted a 5,600-square feet building. Our crew tackled the project in sections so as not to disturb the family for a long period.
Conclusion
Priming is an essential step in most painting projects, exterior and interior. It provides an ideal surface for the paint to adhere to and settle properly. The better adhesion means your paint will last longer. In most cases, priming is required to prepare the surfaces before painting.
Custom Painting, Inc. has provided painting, repairs, and custom installation services for residential and commercial properties in the Bay Area for over 40 years. We pride ourselves in our team of skilled, licensed, and insured painters and carpenters whose commitment to quality service has made our company one of the region’s most sought-after and reliable painting service companies.
If you want to learn more about paint, carpentry, repairs, decor, and custom installation services, call Custom Painting at 925-866-9610 or fill out the online form to schedule an appointment and receive a free estimate.
