

If you’re looking to complete your decorating and refurbishing projects and elevate the overall design, why not consider installing crown molding? This decorative trim is usually installed at the junction of walls and ceilings. Crown Molding comes in various styles, materials, sizes, and colors. It adds a finishing touch that enhances architectural interest and aesthetic appeal.
When considering home decor, crown molding serves functional and decorative purposes. It covers gaps and imperfections while adding a touch of sophistication. For example, if you use crown molding in your dining room, it can significantly enhance its look and ambiance. It creates visual interest, highlights the room’s features, creates a cohesive look, and elevates its overall design.
Benefits of adding crown molding
Crown molding offers several benefits in a space, including:
- Aesthetic enhancement – It adds elegance and visual interest, creating a more finished and polished look.
- Value addition – It can increase the perceived value of a home, making it more attractive to potential buyers.
- Room definition – It helps define the boundaries of a room, adding a sense of structure and order.
- Architectural interest – It enhances architectural detail, making even simple rooms appear more sophisticated.
- Concealing imperfections – It hides gaps and imperfections between walls and ceilings, providing a cleaner appearance.
- Versatility – It is available in various styles and materials to suit different design preferences and budgets.
- Ceiling height illusion – It can make ceilings appear higher, improving spatial perception.
Types of crown molding
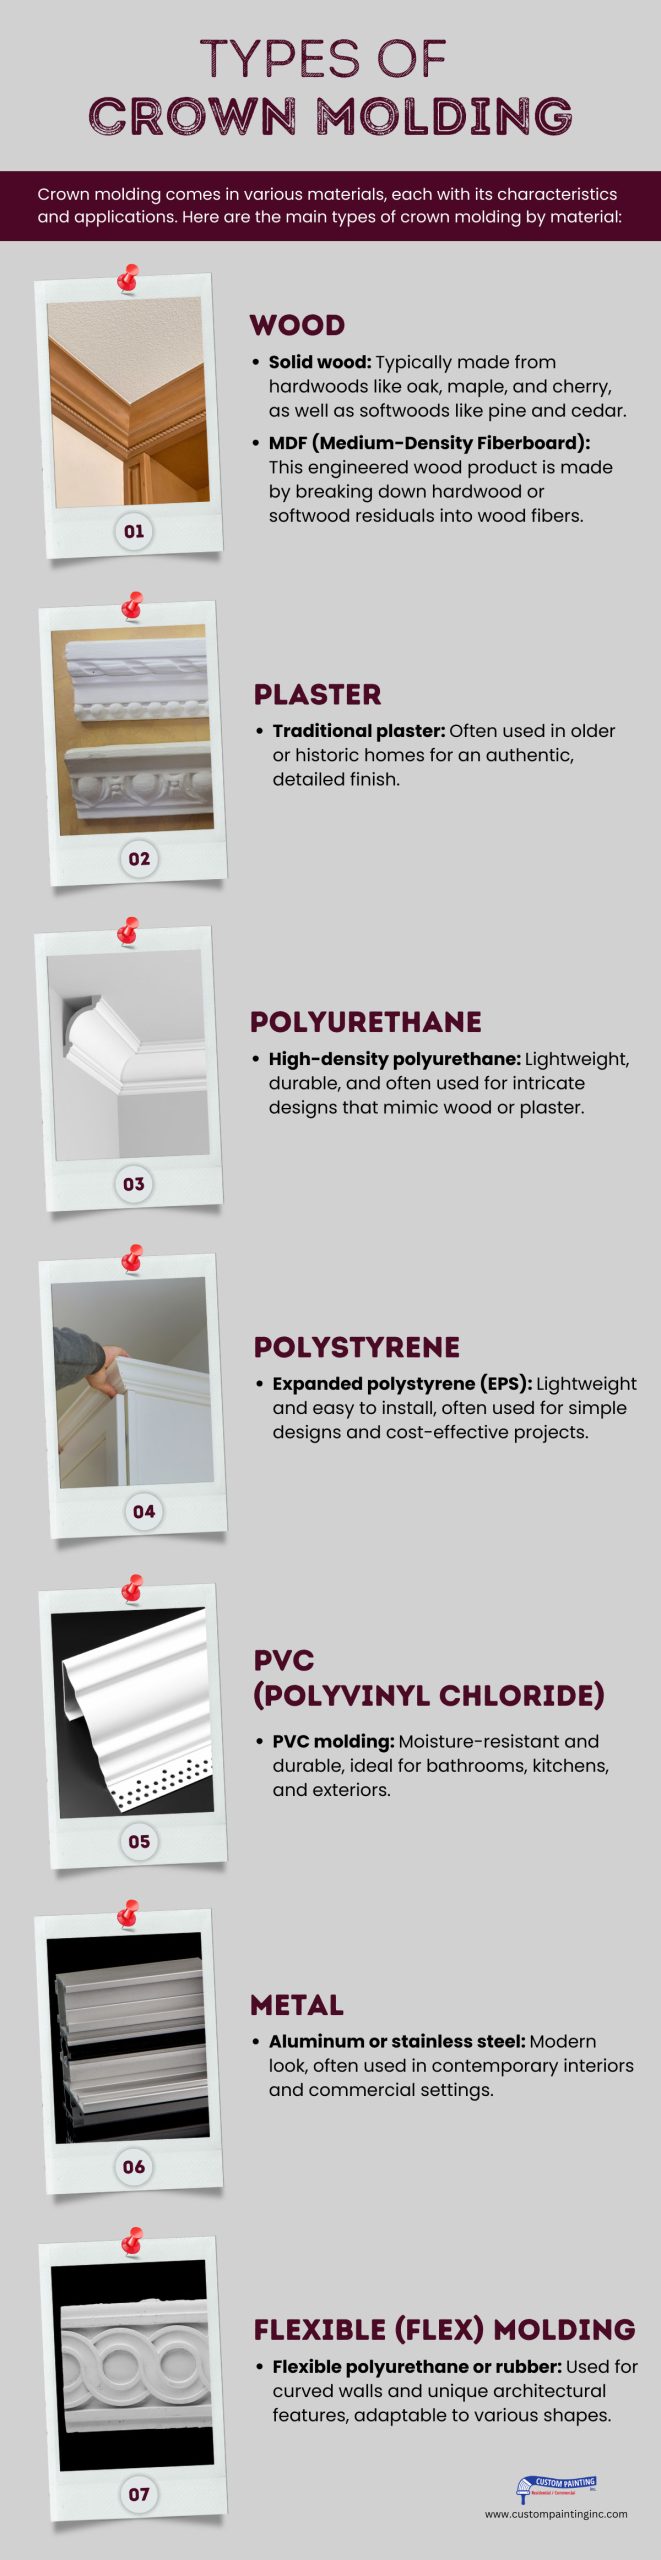
Crown molding comes in various materials, each with its characteristics and applications. Here are the main types of crown molding by material:
1. Wood
- Solid wood – Typically made from hardwoods like oak, maple, and cherry, as well as softwoods like pine and cedar.
- MDF (Medium-Density Fiberboard) — This engineered wood product is made by breaking down hardwood or softwood residuals into wood fibers.
2. Plaster
- Traditional plaster – Often used in older or historic homes for an authentic, detailed finish.
3. Polyurethane
- High-density polyurethane – Lightweight, durable, and often used for intricate designs that mimic wood or plaster.
4. Polystyrene
- Expanded polystyrene (EPS) — Lightweight and easy to install, often used for simple designs and cost-effective projects.
5. PVC (polyvinyl chloride)
- PVC molding – Moisture-resistant and durable, ideal for bathrooms, kitchens, and exteriors.
6. Metal
- Aluminum or stainless steel – Modern look, often used in contemporary interiors and commercial settings.
7. Flexible (flex) molding
- Flexible polyurethane or rubber – Used for curved walls and unique architectural features, adaptable to various shapes.
Design considerations
Consider your home’s architectural style, room dimensions, existing decor, and lighting needs. These factors can help you choose the perfect crown molding for your dining area.
Your dining room’s style and architecture
- Traditional architecture – Choose ornate crown moldings with intricate patterns. Examples are dentil or egg-and-dart designs that complement classical or colonial-style dining rooms.
- Modern architecture – Choose sleek, simple moldings with clean lines and minimal detailing to match contemporary spaces.
- Transitional spaces – Combine elements from traditional and modern styles. Use crown molding that has subtle detailing but maintains a clean profile.
Your dining room’s size
- Ceiling height – Higher ceilings (over 9 feet) can accommodate larger, more elaborate moldings. Lower ceilings (8-9 feet), on the other hand, should use smaller, less overwhelming moldings.
- Room size – Larger dining rooms should use broader and more substantial moldings for a dramatic impact. In contrast, smaller rooms should use narrower moldings to prevent the space from feeling cramped.
Your crown molding’s color and finish
It can be a challenge in any painting project to determine the proper color for a new painting project.
Matching with existing decor
- Same color as the ceiling – It creates a seamless transition and makes the room appear more spacious and cohesive.
- Same color as the walls – This approach can make the molding less prominent, offering a more subtle elegance.
Contrasting styles for a bold statement
- Bold contrast – Choose a color that contrasts with the walls or ceiling (e.g., white molding on dark walls). This highlights the molding and adds visual interest and drama to the space.
- Accent colors – Use an accent color found elsewhere in the room (e.g., furniture or textiles). This can tie the room together and create a cohesive look while making the molding stand out.
Lighting concealment or enhancement with crown molding
Concealing lighting fixtures
- Cove lighting – Install crown molding with a gap behind it to hide LED strips or rope lighting. It creates a soft, indirect light. It also adds ambiance and highlights the room’s architectural features.
- Recessed lighting – Install crown molding to conceal the edges of recessed lighting fixtures. This provides a cleaner and more polished look.
Enhancing lighting
- Uplighting – Pair crown molding with uplighting. It creates a warm and inviting glow to your dining area. It also accentuates the ceiling and adds depth to the space.
- Downlighting – Integrate downlighting within the molding to cast light downwards. It helps emphasize wall textures or artwork. It also provides functional light for the dining area.
Preparation steps
Measuring the Room: Tools needed and tips for accurate measurement
Tools needed
- Tape measure
- Notepad and pencil
- Laser Measure (optional for higher accuracy)
Tips for accurate measurement
- Measure the length of each wall where you’ll install the crown molding.
- Note any angles or corners, as these will affect the cuts needed.
- Double-check all measurements to ensure accuracy and account for any irregularities in wall lengths.
Selecting tools and materials: What you’ll need for the installation process
- Tools
- Miter saw (for precise angle cuts)
- Coping saw (for inside corners)
- Nail gun and nails
- Level
- Caulking gun
- Stud finder
- Measuring tape
- Sandpaper
- Paintbrushes (if painting)
Materials
- Crown molding
- Wood filler or caulk
- Paint or stain (optional)
- Adhesive (optional, for extra hold)
Pre-installation tips: Surface preparation and safety measures
Surface preparation
- Clean the installation area to ensure the molding adheres well.
- Remove any old molding or obstructions.
- Check walls and ceilings for level and flatness, addressing any noticeable irregularities.
Safety measures
- Wear safety goggles and hearing protection when cutting molding.
- Use a sturdy ladder or scaffolding to reach high areas safely.
- Ensure the power tools are in good working condition and used as per the manufacturer’s instructions.
Step-by-step installation guide

Step-by-step instructions for installing crown molding
1. Measure and plan — Measure the length of the walls where you will install the crown molding. Plan the cuts and note the angles needed for the corners.
2. Gather tools and materials – You’ll need crown molding, a miter saw, a coping saw, a tape measure, a level, a pencil, nails or a nail gun, wood filler, sandpaper, and paint or stain.
3. Cut the molding:
- Inside corners – Use a coping saw or miter saw set to 45 degrees.
- Outside corners – Use a miter saw set to 45 degrees.
- Straight sections – Measure and cut straight sections to fit between corners.
- Prepare the walls and ceiling – Ensure the walls and ceiling are clean and free of obstructions. Mark the studs on the walls and the joists in the ceiling.
-
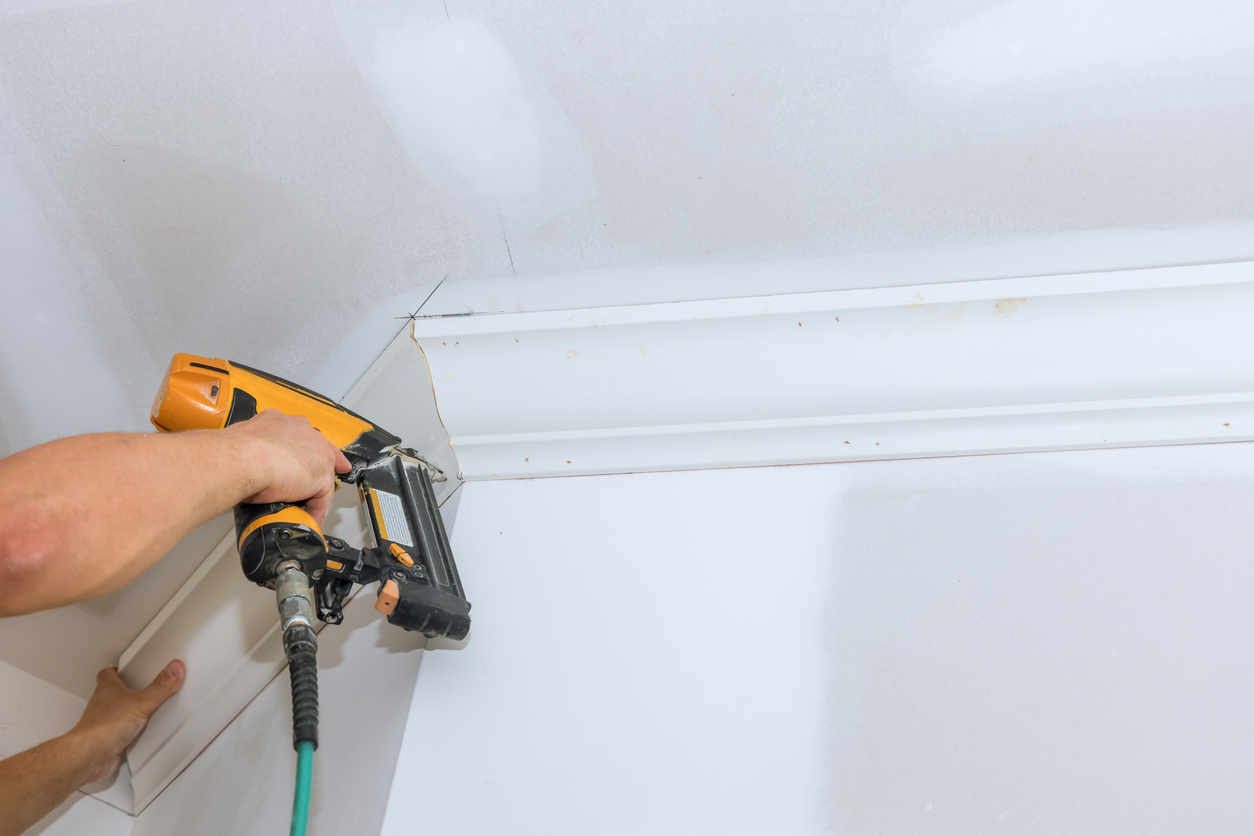
4. Install the molding
- Start with the longest wall.
- Use a level to ensure the molding is straight.
- Secure the molding with finishing nails or a nail gun, nailing into the studs and ceiling joists.
5. Join the sections – Apply wood glue to the joints where two pieces of molding meet and secure with nails.
6. Finish – Fill nail holes with wood filler and sand the filled areas smoothly. Then, paint or stain the molding.
Tips for cutting and joining sections
- Inside corners – Cope the joints by cutting one piece at a 45-degree angle and using a coping saw to trim along the cut’s profile. This allows it to fit snugly against the adjacent piece.
- Outside corners – Cut both pieces at opposite 45-degree angles to form a seamless corner when joined.
- Consistent angles –Ensure all cuts are made with the molding positioned at the same angle against the miter saw’s fence to maintain consistency.
Advice on securing the molding
- Nailing – Use finishing nails for this step. Nail into the studs and ceiling joists for a secure fit. Pre-drill holes to prevent splitting.
- Adhesive – Apply a construction adhesive to the back of the molding before nailing for additional hold.
- Alignment – Use a level and temporary support blocks if needed to keep the molding straight and level during installation.
- Finishing touches – After securing, use caulk to fill any gaps between the molding and the wall or ceiling for a polished look.
Finishing touches
Caulking and painting: Best practices for a professional finish
- Preparation – Clean the crown molding thoroughly to remove dust and debris.
- Caulking – Apply a high-quality, paintable caulk to fill gaps between the molding and the wall or ceiling. Smooth the caulk using your wet finger or caulking tool.
- Priming – Use a primer to ensure paint adhesion, especially if the molding is bare wood or has stains.
- Painting – Use high-quality paint and a fine brush for detailed work. Apply at least two coats for even coverage. Sand lightly between coats for a smooth finish.
Decorating tips: How to accessorize around crown molding for maximum impact
- Color contrast – Paint the crown molding in a color contrasting with the wall to highlight its architectural detail.
- Lighting – Install uplighting or LED strips along the molding to create a dramatic effect and enhance the room’s ambiance.
- Wall art – Position artwork or decorative mirrors to draw attention to the crown molding and create visual interest.
- Furniture placement – Arrange furniture to direct the eye upward, emphasizing the crown molding. Tall furniture pieces like bookcases or cabinets can help achieve this effect.
- Complementary décor – Use decorative elements such as wainscoting or chair rails that complement the crown molding’s style for a cohesive look.
Maintenance and care
Regular cleaning and care
- Dusting – Regularly dust the crown molding using a soft cloth or a duster to prevent dust buildup.
- Cleaning – Occasionally clean with a damp cloth and mild soap. Avoid using harsh chemicals that can damage the finish.
- Inspecting – Periodically check for any signs of damage or wear, such as cracks or gaps.
Repair advice for common issues
- Chips – Fill small chips with wood filler or putty. Sand smooth once dry and touch up with matching paint or stain.
- Detachment – For detached sections, reattach using construction adhesive and small finishing nails. Use caulk to fill any gaps and paint to match the surrounding area.
Conclusion
Crown molding can dramatically enhance a dining room’s aesthetic by adding elegance and visual interest. It transforms the space into a more sophisticated and finished area. Undertaking this project can boost the room’s appeal and increase your home’s overall value. These benefits make crown molding a worthwhile investment for enjoyment and potential resale benefits for homes in the Fremont, Union City, Milpitas, Sunol, Newark, San Jose, Sunnyvale, Santa Clara, Mountain View areas.
Custom Painting, Inc. offers expert crown molding services for residential and commercial buildings. Are you looking to complete and enhance the look of your space with crown molding? Call us at 925-866-9610 or complete our contact form for a free job estimate.
