

When it comes to giving your Fremont home a fresh look, painting new plaster walls is a popular choice for many homeowners. However, the process is not as straightforward as applying a coat of paint to an old wall. New plaster requires special attention and preparation to ensure the final paint job looks flawless and lasts for years to come.
This article will guide you through the key factors you need to consider before picking up the paintbrush. From understanding the drying process of plaster to choosing the right type of paint and the necessary preparations, we’ll cover what you need to know to make an informed decision and achieve professional-quality results in your painting project. Whether you’re a DIY enthusiast or planning to hire professionals, this article provides valuable insights to ensure your new plaster walls are painted beautifully and effectively.
Understanding What Plaster Is
Plaster is a building material that coats, protects, and decorates interior walls, ceilings, and sometimes exterior walls. It’s known for its durability, versatility, and ability to provide a smooth or textured finish. Plastering is an ancient technique that has evolved over time, incorporating different materials and methods to suit various architectural and aesthetic requirements. Here are the most common types of plaster:
- Gypsum Plaster: Gypsum is the most common form of plaster for interior walls. It’s made by heating gypsum to a high temperature, which is then ground into a fine powder and mixed with water to form a paste. Gypsum plaster sets quickly and does not require lime or sand. It provides a smooth, paint-ready surface and is known for its fire-resistant properties.
- Lime Plaster: Lime plaster is made from lime and water, with sand often added for bulk. Historically, it was one of the primary plastering materials. Lime plaster is breathable, making it suitable for older buildings where moisture transfer is necessary to prevent the build-up of dampness. It is also flexible, reducing the risk of cracking with building movement.
- Cement Plaster: Cement plaster is a mixture of Portland cement, suitable plaster, sand, and water. This type is commonly used for exterior walls due to its strength and durability in various weather conditions. Cement plaster can also be used for major interior walls in wet areas like bathrooms and kitchens.
- Clay Plaster: Clay plaster is an eco-friendly option made from clay, sand, and water, with straw or other fibers added for strength. It’s non-toxic and breathable, making it an excellent choice for green building projects. Clay plaster provides a natural aesthetic and can be colored with natural pigments.
- Stucco: Often used for exterior walls, stucco is a type of plaster made from cement, lime, sand, and water. It can be applied in multiple thin layers to create a strong, weather-resistant surface. Stucco finishes can range from smooth to highly textured.
- Venetian Plaster: Venetian plaster is a finishing technique that uses thin plaster layers applied with a spatula or trowel, then it is burnished to create a smooth surface with the illusion of depth and texture. It’s made from lime putty and marble dust and gives a polished, marble-like appearance.
Each plaster type has unique properties, application techniques, and aesthetic appeal, making it important to choose the right one based on the specifics ofyour project, including the desired finish, the environment (interior or exterior), and the building’s historical context.

Drying and Curing Process of Plaster
The drying and curing process of plaster is crucial for achieving a strong, durable finish that’s ready for decorative painting. This process involves two main phases: drying and curing, which are often used interchangeably but represent different aspects of how plaster solidifies and stabilizes after application.
Drying
Drying refers to the evaporation of water from the plaster mix after it has been applied to a surface. When plaster is first applied, it’s in a wet, paste-like state, which allows it to be spread and shaped. The water evaporates from the mixture as it dries, causing the plaster to harden. The rate at which plaster dries can be influenced by several factors, including:
- Ambient temperature: Warmer temperatures generally increase how fast the drying process is, while cooler temperatures slow it down.
- Humidity levels: High humidity can significantly slow the drying process because the moist air slows water evaporation from the plaster.
- Ventilation: Good airflow helps carry away the moisture released from the plaster, aiding in faster drying.
- Thickness of the application: Thicker layers of plaster take longer to dry because the water has more difficulty escaping from the deeper parts of the plaster.
It’s important to allow the plaster to dry naturally. Avoid the temptation to speed up the process with direct heat sources, as this can lead to cracking and other issues.
Curing
Conversely, curing is the chemical process that plaster undergoes as it hardens, which continues even after the plaster feels dry to the touch. During curing, the components of the plaster react with each other and with the air. For example, in gypsum plaster, the dehydration of gypsum in the manufacturing process is partially reversed, forming a crystalline structure that binds the plaster particles together. In lime and cement plasters, the curing process involves the absorption of carbon dioxide from the air (carbonation) and the continuing hydration of the lime or cement, further strengthening the material.
The curing process is critical for the plaster to achieve its full strength and durability. It can take anywhere from a few days to several weeks, depending on the type of plaster and environmental conditions. Full curing can take even longer for some types of plaster, especially those used in external applications or wet areas.
- Avoid painting or applying wallpaper: It’s essential to wait until the plaster is fully dry and cured before painting or applying wallpaper. Painting too soon can trap moisture, leading to paint failure, mold growth, or wallpaper peeling.
- Monitoring: Keep an eye on the plaster as it dries and cures, checking for any signs of cracking or damage that might need repair.
- Professional advice: For specific projects, especially those involving historical restoration or specialized plasters, consulting with a professional can provide guidance on optimal drying and curing times.
Understanding plaster’s drying and curing processes is key to ensuring a successful finish, whether you’re plastering a new wall or repairing an old one. Patience during these stages ensures the plaster achieves the desired strength and surface quality for further decoration.
What Happens When You Paint Too Soon?
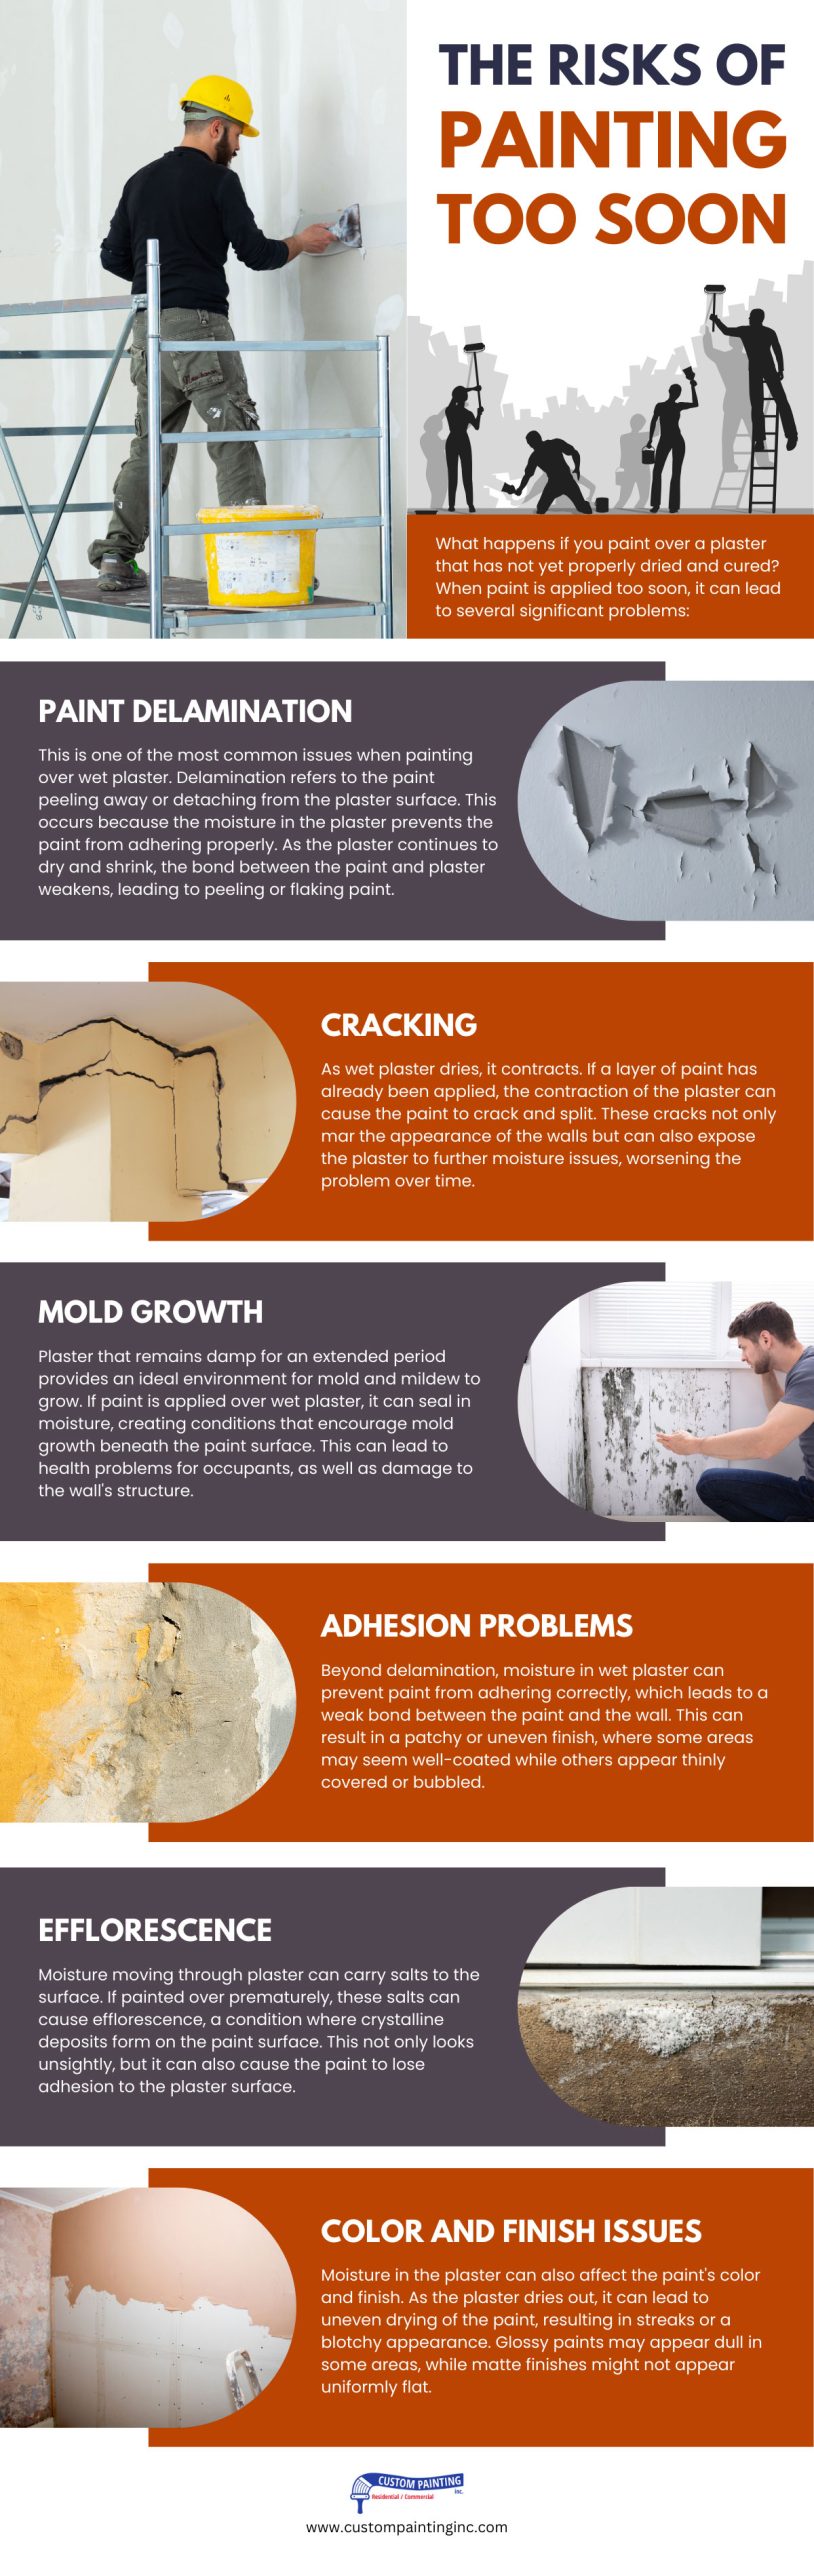
Painting plaster before it has fully dried and cured can lead to several problems that can compromise the quality and longevity of the paint job as well as the plaster itself. Here are the main risks associated with painting plaster too soon:
- Poor Paint Adhesion: If the plaster is still damp, the paint may not adhere properly to the surface. This can result in peeling or flaking paint over time, as the presence of moisture weakens the bond between the paint and the plaster surface.
- Blistering and Bubbling: Moisture trapped beneath the paint layer can lead to blistering and bubbling as it tries to escape through the paint. This looks unsightly and means the paint will likely need to be stripped and reapplied once the plaster is fully dry.
- Mold and Mildew Growth: Painting over damp plaster can create an environment conducive to mold and mildew growth. The moisture trapped under the paint provides the perfect conditions for mold spores to grow, which can lead to health problems and will require remediation.
- Color and Finish Issues: The presence of moisture can affect the appearance of the paint once it dries. You might find uneven color, a patchy finish, or a lack of the expected sheen due to the interaction between the moisture in the plaster and the paint.
- Efflorescence: This is a condition where salt deposits form on the surface of the plaster and paint due to moisture moving through the material. It appears as a white, powdery substance on the surface, which can ruin the appearance of the paint and may require extensive effort to remove.
- Structural Damage: In extreme cases, painting over wet plaster can lead to structural damage. As the plaster continues to dry and contract, it can cause cracks in the paint and potentially in the plaster itself. This compromises the integrity of the wall or ceiling surface.
- Extended Drying Time: The overall drying time for the paint and the plaster may be extended if the plaster was not adequately dry before painting. This can delay the completion of the project and increase the risk of damage before the paint has set.
The plaster should be fully dried and cured before painting to avoid these issues. This typically involves waiting several days to weeks, depending on the plaster type, the application’s thickness, and the environmental conditions. Using a moisture meter can provide a more accurate assessment of the plaster’s moisture content and readiness for painting. Additionally, applying a mist coat (a watered-down emulsion paint) as the first coat can help seal the plaster and provide a good base for subsequent coats of paint.
Steps to Prepare Newly Plastered Wall for Painting
Preparing a newly plastered wall for painting is crucial to achieve a smooth, durable finish. The process involves several key steps to ensure the plaster is ready to accept paint and to prevent issues such as poor adhesion, peeling, or bubbling. Here are the steps to prepare a newly plastered wall for painting:
1. Ensure the Plaster is Fully Dry
Wait: Allow the plaster to dry completely, which can take anywhere from a few days to several weeks, depending on the type of plaster, thickness, and environmental conditions.
Check for dryness: The plaster should change to a light, uniform color when it’s dry. You can also use a moisture meter to check the moisture content of the plaster.
2. Remove Dust and Debris
Clean the wall: Once dry, use a soft brush or vacuum with a brush attachment to remove any dust and debris from the surface of the plaster. This helps ensure a smooth finish and proper adhesion of the paint.
3. Address Any Imperfections
Fill holes and cracks: Use a suitable filler to repair any small holes or cracks in the plaster. Once the filler is dry, sand it smooth to match the surrounding surface.
Sand the surface: Lightly sand the entire wall with fine-grit sandpaper to achieve a smooth finish. Be gentle to avoid damaging the plaster.
4. Apply a Mist Coat
Mix the mist coat: Create a mist coat by diluting water-based emulsion paint with water. A common ratio is 70% paint to 30% water, which can vary depending on the manufacturer’s recommendations.
Apply the mist coat: Use a roller or brush to apply the mist coat evenly over the wall. The mist coat acts as a primer, sealing the plaster and providing a suitable surface for subsequent paint layers.
5. Allow the Mist Coat to Dry
Drying time: Wait for the mist coat to dry completely. This usually takes a few hours, but following the paint manufacturer’s guidance on drying times is best.
6. Apply Top Coats of Paint
Apply the first topcoat: Once the mist coat is dry, use a roller or brush to apply the first topcoat of your chosen paint. Be sure to follow the paint manufacturer’s instructions for the best results.
Sand between coats: If necessary, lightly sand the wall between coats to remove any imperfections or brush marks, ensuring each coat is dry before sanding.
Apply additional coats: Depending on the color and type of paint, you may need to apply one or more additional topcoats to achieve the desired coverage and finish.
7. Final Touches
Inspect the finish: Once the final coat is dry, inspect the wall for any missed spots or imperfections and touch up as needed.
By following these steps, you can ensure that your newly plastered wall is properly prepared for painting, resulting in a professional-looking finish that lasts.
The Right Paint and Tools

Choosing the right paint and tools is essential for achieving a professional finish on newly plastered walls. Here’s a guide to help you select the appropriate materials and equipment for the job:
Paint Types
- Water-Based Emulsion Paint: This is the most common type of paint used for interior walls. It’s ideal for newly plastered walls because it’s breathable, allowing any residual moisture in the plaster to evaporate. For the initial coat, you’ll need to dilute the emulsion with water to make a mist coat, which seals the plaster and provides a good base for subsequent coats.
- Breathable Paints: Some paints are specifically formulated to be more permeable to water vapor, making them suitable for newly plastered walls that might still be releasing moisture. These are particularly useful in older buildings or in rooms with potential damp issues.
Avoid using oil-based or vinyl paints as the first layer on new plaster, as they can create a seal that traps moisture in the plaster, leading to potential problems such as peeling or blistering.
Primers and Undercoats
- Primer: Not always necessary for newly plastered walls, especially if you use a mist coat. However, if you’re using a specialty paint or if the manufacturer recommends it, you might need a water-based primer.
- Undercoat: This is generally not required for newly plastered walls if you’re using emulsion paint. Undercoats are more commonly used with oil-based paints or to prepare for a significant color change.
Tools for Painting
- Rollers: A medium-pile roller is ideal for most emulsion paints, providing a smooth finish and efficient coverage. For very smooth plaster, a short-pile roller may be better to avoid leaving texture from the roller nap.
- Brushes: Use high-quality synthetic brushes for water-based paints. You’ll need a variety of sizes: a wider brush (around 3 inches) for large areas and a smaller angled brush for cutting in at edges and corners.
- Paint Tray: For rolling paint, a sturdy paint tray is essential. Consider one with a ribbed area for removing excess paint from the roller.
- Extension Pole: An extension pole for your roller can help you reach higher areas comfortably and ensure an even application of paint without the need for ladders for most of the work.
- Sandpaper: Fine-grit sandpaper is useful for smoothing any minor imperfections in the plaster or between coats of paint.
- Dust Sheets and Masking Tape: Protect your floors and furniture with dust sheets, and use masking tape to cover skirting boards, door frames, and any other areas you don’t want to paint.
- Ladder or Step Stool: A stable ladder or step stool will be necessary for higher areas to reach all parts of the wall safely.
Additional Tips
- Always check the paint manufacturer’s instructions for compatibility with plaster and any specific application guidelines.
- Consider the finish (e.g., matte, satin, eggshell) based on the room’s use and desired aesthetic. Matte finishes can help hide imperfections but may be less durable, while glossier finishes are easier to clean but highlight flaws.
- Test the paint color on a small section of the wall and view it in different lights to ensure it meets your expectations before committing to the entire room.
Using the right paint and tools will make the painting process smoother and ensure a durable and visually pleasing finish on your newly plastered walls.
Hire Professionals
Hiring Sunnyvale area professionals for painting or plastering projects can significantly enhance the quality and efficiency of the work. Professional painters and plasterers possess the expertise, experience, and tools necessary to achieve a flawless finish, whether it’s preparing and smoothing out new plaster or applying paint with precision. They understand the intricacies of different materials and environments, ensuring that the right techniques and products are used for durability and aesthetic appeal.
Moreover, professionals can save you time and avoid the potential for costly mistakes or redoing work, making them a valuable investment for homeowners seeking high-quality results. Additionally, many professional services come with guarantees or warranties, providing peace of mind that the job is done right. Opting for professional help can simplify your space, allowing you to enjoy a beautifully finished home without the stress of DIY projects.
Conclusion
Applying paint to new plaster is achievable, yet it diverges from the standard procedure used on typical drywall, necessitating several considerations beforehand. The task of painting over plaster demands diligence and a meticulous approach. A hasty or incorrect method can result in an unsatisfactory outcome. The process of painting on newly plastered surfaces is intricate, requiring extra time and careful handling to avoid complications that may necessitate redoing the work.
To ensure a flawless paint job on a newly plastered wall from the start, it’s recommended to enlist the expertise of a professional house painter. For those in Fremont, CA, seeking top-notch service, reaching out to a seasoned painting company is a wise choice. Consider contacting Custom Painting, Inc. for their professional assistance. You can give them a call at 925-866-9610 or send a message using this contact form for immediate service.
